Oscilloscope Music
The full webpage with all the programming and hardware details can be found here.
Introduction
Our project, oscilloscope music, allows users to interact with and explore different types of signals, in order to create interesting visuals and sounds.
Using a GUI, the user can control signals’ many degrees of freedom such as frequency, amplitude and relative offsets, which change the visual on the oscilloscope and the sound from speakers. This is accomplished by sending the same signals from our PIC32 microcontroller to a scope and a set of speakers simultaneously. Similar to how earbuds and speakers have two channels (e.g. left and right), our oscilloscope also has two channels. When placed in XY mode, the x-position and y-position of the scope’s cursor can be controlled independently. This allows us to create different types of shapes when varying the frequency, relative phase between the two signals, sampling frequency, etc. Since we are sending the same signals to the oscilloscope and speakers, the user can visualize the output audio and hear the displayed image.
In order to do this, we have both the computer speaker connected to the PIC32, the microcontroller we used for the course and this project, as well as a GUI communicating with the PIC32 serially, allowing us to either stream sound from the computer such as through a YouTube video or mp3 file to the oscilloscopes and speakers, or interact with varying degrees of freedom for signals on our GUI, along with some pre-set visuals, demos, and music, to be able to interact with both the sound that is heard as well as the images that are displayed.
We decided to pursue this project since we all have a fascination with being able to visualize music, and we thought it would be interesting to learn more about the mathematical side of signals and their degrees of freedom in order to explore what shapes make what sound. We also felt this project had more artistic aspects, allowing us to explore music as well. Through this project, we were able to learn a lot more about direct digital synthesis and explored more through this project in order to generate various types of signal waves. We also learned more about python GUIs and serial communication which we used to both communicate to the PIC32 to control the signals and also to update the GUI when we run our demo or music modes to reflect what settings are being played.
High Level Design
For our project, we found inspiration through numerous YouTube videos of oscilloscope visualizations of music. We found it fascinating how they could create such interesting and complicated visuals just from two signals, so we wanted to investigate it more. To try it for ourselves, we directly scoped the two channel audio from those YouTube videos to see what they look like and were sold on the idea when we saw the animations on our own oscilloscope.
Our final design has a few different modes — streaming, signal tuning, shape selector, demo, and music — which can be selected using a python GUI. In each mode, some output is sent through the two DAC outputs to channel 1 and channel 2 of the oscilloscope, displaying the signal as well as to the speaker to play the corresponding sound.
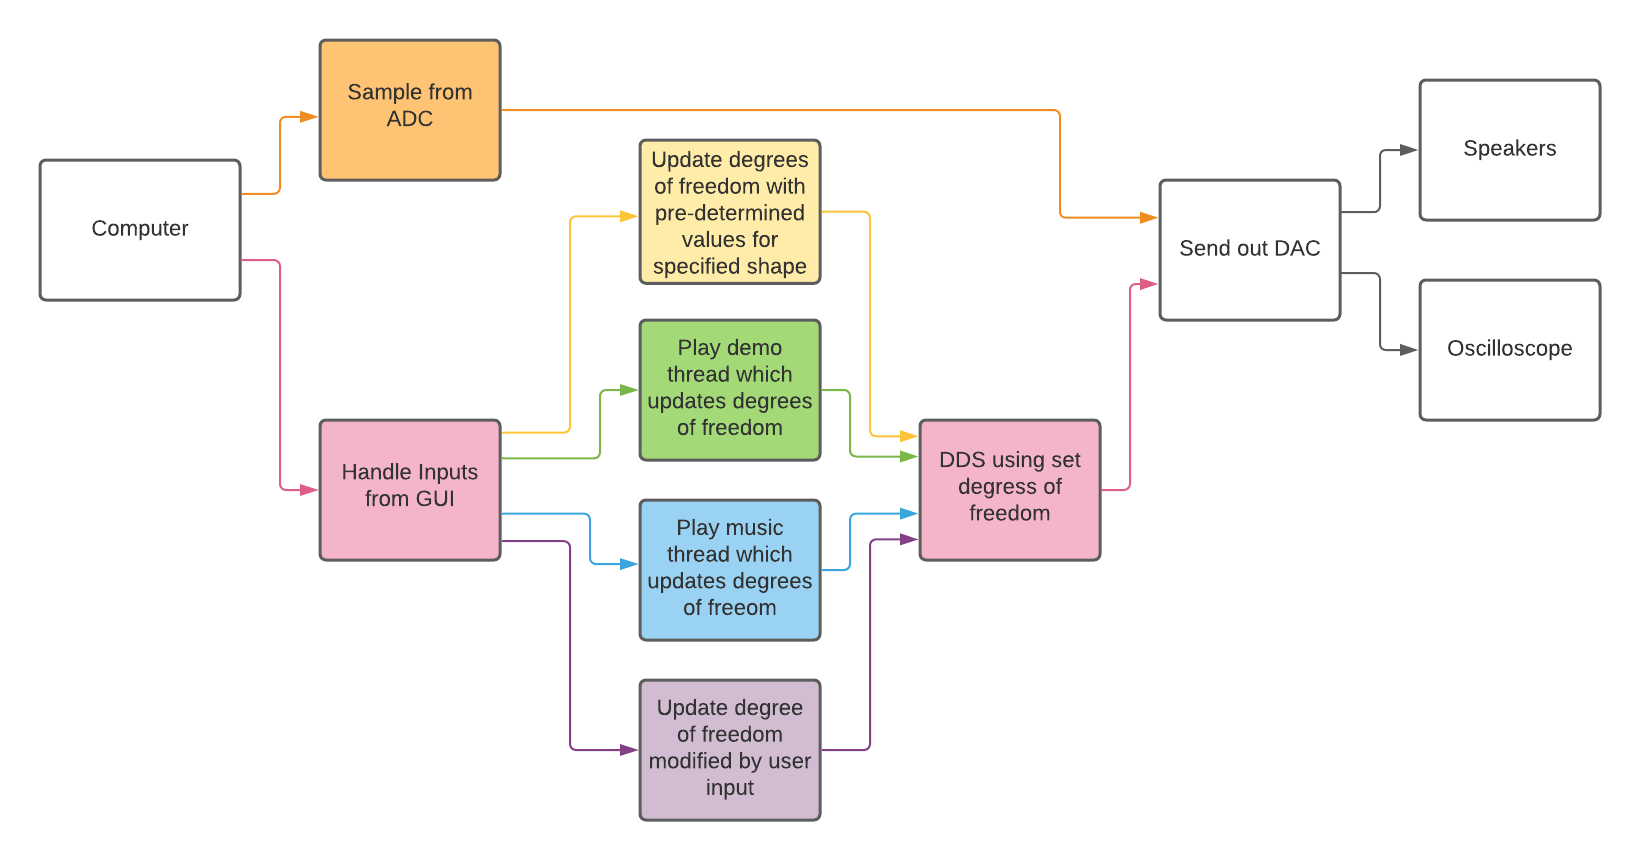
In the streaming mode, the output audio from a computer (or any signal that can be output through a headphone jack) is displayed on the oscilloscope. The two channels from the computer audio are taken in and sampled through the ADC, and then sent through the DAC. Although this is not strictly necessary to view signals on the scope, it keeps the usage of our PIC32 consistent and prevents the user from having to rewire our project when changing between modes. In signal tuning mode, we allow the user to customize the two output signals. The user can change attributes like the shape, frequency, amplitude, spiraling, and relative phase of the two signals to create custom shapes. In shape selector mode, the user can select from a variety of shapes (circle, diamond, lissajous of different orders, horizontal and vertical lines, dots, or a cube). In this mode, the PIC32 controls the GUI, moving and setting the sliders and buttons on the GUI to show how you would get those shapes in the signal tuning mode. Next, we have our demo mode that plays a predetermined visually pleasing sequence on loop. Similarly, the music mode plays the Cornell Alma Mater on loop with visuals on the oscilloscope. Both the demo and music also show the settings of how to generate the images and sounds played. In every mode, we also allow the user to change sampling frequency. The block diagram illustrating these various modes can be seen in the figure below where orange indicates PC streaming, pink indicates the modes besides PC streaming, yellow indicates shape selector, green indicates demo, blue indicates music, purple indicates signal tuning, and white indicates steps that include all of the modes.
Results
In order to introduce stability in our project, we utilized the GUI and the various restrictions involved as well as the ability to update what we see on it. For example, we described above how the interface can only change specific variables when in certain modes, which helps to prevent the user from changing what frequencies are being played in the middle of the music demo. Restrictions such as this prevent the user from violating the purpose and design of the project in order to ensure the experience of the user is what it’s intended to be. One issue of this however, is that even if a user changes an input on the GUI that doesn’t take effect on the C code, but will still modify the GUI. We work to prevent this from happening through our updating of the GUI thread, including more safety in our design. By doing this, if a user tries to change a degree of freedom when they are in the incorrect mode, they will receive automatic feedback with the GUI resetting to be the current values (not what they incorrectly tried to update). This both prevents the user from making changes and thinking that the GUI is broken while also ensuring the safety of the various modes.
On the other hand, all of this updating of the GUI makes it kind of slow. Especially because we have so many inputs to modify all of the various degrees of freedom, the updates take a while and are therefore delayed when we try to do it real time. While this doesn’t make a huge difference in the overall experience when it comes to modes such as PC streaming (since it doesn’t involve the GUI), signal tuning, shape selector, and the demo mode, we did notice a bit of a lag especially in the music mode where the changes occur fairly quickly.
One of the other differences in the results than we intended was through our PC streaming mode. In order to test our functionality, we pulled up some of our inspiration oscilloscope music videos in order to see if we could replicate what they created based on playing that YouTube video. While there were aspects that did look similar, there were some major differences in what we were displaying on our oscilloscope compared to what they had on the video. We believe this is partly due to not being able to separate the channels exactly how they did since we are playing it back through YouTube, which we aren’t sure of how that would affect the sound and which channel it plays out of. We are happy with the results, but wish we had an opportunity to investigate this more because it would have been amazing to replicate oscilloscope music designs just through pulling up a video on a computer. We decided not to include any videos of the differences due to possible copyright infringement since they are videos we found on the internet.
Overall, we feel like our project was a success and are very happy with the results! We were able to support different modes for different features, created a demo that was able to not only show off interesting visualizations, and created a music demo that was able to play a song and show what it looks like. We also took time to ensure the quality of our work such as introducing the amplitude envelope for the music mode in order to avoid the popping noise when changing notes as well as facilitated communication back to the GUI in order to teach the user the effects the degrees of freedom have on the sounds and visuals. In addition, we ensured that our shapes looked like what was advertised and that we kept each of the modes isolated, so that they didn’t affect one another. Not only that though, but we also created a project that anyone could get lost in playing with and enjoying. Our full demo video can be seen below.
Description
ECE 4760 Final Project
November 2021 - December 2021
This project was created for ECE 4760 at Cornell University. My teammates for this project were Eric Kahn and Ruby Min.