KeyStroke
We set out to design a platform to provide data analytic feedback to people learning piano. We divided the project into 4 main parts: The physical construction of a keyboard, circuit design for real time feedback and data transfer, programming that microcontroller system, and the webserver to display and track your progress. This project was completed in 24 hours at this years Make-a-thon!
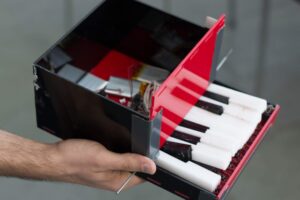
Construction (Jake)
Although we could have modified an electric keyboard, we wanted the ability to customize it for the project, and thought that it was more true to the makeathon spirit to build it from scratch. The chassis and keys were all designed and lasercut out of cast acrylic. The walls all had slotted connections that were then glued together, and the keys are made up of layers of acrylic. The keys were then connected on a steel rod acting as the fulcrum, with rubber bands in the back to act as a counterbalance and to provide tactile feedback for the keys.
One of the best decisions we made in building this thing from scratch was to make a prototype out of cardboard. At the time it felt like a bit of a waste of time, but as we set it up we realized all the mistakes we made in the design. In the end it saved us so much more time because we were able to fix the issues before they even happened!
Circuit (Jack)
The main goal of the electronics was to sense when the user pressed the keys and send this data to the webserver for processing. We did this by wiring up 12 pushbuttons, one for each key, and setting up one adafruit feather to monitor them. Then we set up the Feather ESP8266 to communicate with the first feather over i2c, and send that data over to the webserver. We connected a 10k Ohm pullup resistors to each line. Finally we hooked up a small speaker to provide audio feedback just like a real keyboard, and wired this to the one remaining pin on the button feather. This system worked really well, and leaves us a lot of room to expand in the future by adding more devices to the i2c bus.
Arduino Code (Me)
The job of the arduino code was to integrate all of the electrical hardware and communicate to the webserver. To read the buttons we polled all of the buttons on a loop and passed it on to the wifi feather. This was done over i2c both to save output pins, and to open up the system to expansion later on, as we can chain several devices to send data over the same bus. Then we had to write separate code for the wifi feather, which had to integrate reading from the i2c bus with sending data packets to the webserver. You can check out our arduino code on the Github!
https://github.com/SpaceProtocol/KeyStroke/tree/SCobado-Arduino
Web Server (Luca)
For the web application, we used a Node.js web application framework called Express to deal with communication between the Arduino ESP8266 WiFi shield and the backend. The frontend was made with custom HTML & CSS and Javascript. It detailed a welcome/home page, a data page, which displayed data collected from the hardware as well analysis of said data, and a visualization page, which used a cross-browser javascript library called Three.js to display keypresses as 3D, sinusoidal waveforms on a mesh of points, complete with time evolution and dampening. Check out the code on Github!
https://github.com/SpaceProtocol/KeyStroke/tree/SpaceProtocol-frontend
Description
Cornell Make-a-thon 2019
Feb 16-17 2019
This project was created as part of the Cornell Make-a-thon. It was my first time participating in a make-a-thon.